Voyage Rules
![]()
|
The Voyage Rules page allows you to keep track of all voyage rules that influence how the allocation plan is generated. |
From the Home page, click the Manage Allocations menu in the right-hand corner of the page, then click Voyage Rules.
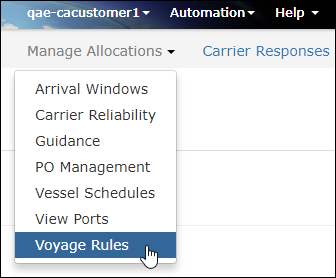
Figure 1: Manage Allocations - Voyage Rules
The Voyage Rules page will appear.
To find a specific voyage rules, enter search criteria and click Search.
|
Tip: You can add additional filters to the search that are specific to your company. Contact your Expeditors Representative for more details. |
To edit a voyage rule, click Edit in the row you want to edit.
To delete a voyage rule, click Delete in the row you want to delete.
Click Manage Conflicting Voyage Rules to view all system-created target rules and whether or not there are any conflicts or warnings between system-created target rules and existing voyage rules. See Manage Conflicting Voyage Rules for more information.
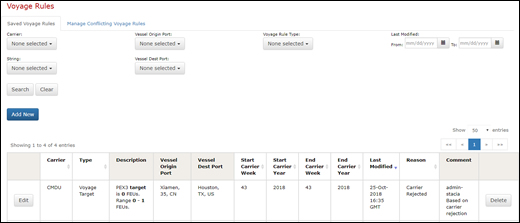
Figure 2: Voyage Rules Page - Saved Voyage Rules Tab
You can add a minimum requirement of FEUs for a specific carrier and string that should be met depending on the carrier week.
1 Click Add New. The Add New Voyage Rule pop-up window appears. For the Type of Voyage Rules drop-down list, select Minimum.
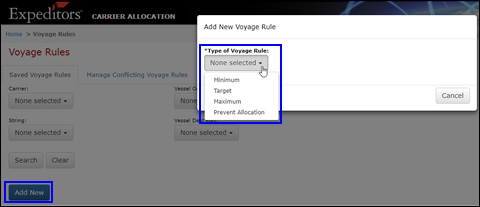
Figure 3: Add New Voyage Rule Pop-up Window
2 The Add Minimum Voyage Rule pop-up window appears. Select the Carrier and Strings from the drop-down lists. Enter the Start Carrier Week and End Carrier Week that the rule will be valid, and that the instruction will take effect. You can include the Start Carrier Year and End Carrier Year if your rule spans multiple calendar years.
Enter the Minimum FEUs and select a Reason for the instruction.
You can optionally select a specific Vessel Origin Port and Vessel Destination Port and Destination Type to help make your Voyage Rule different from other similar Voyage Rules.
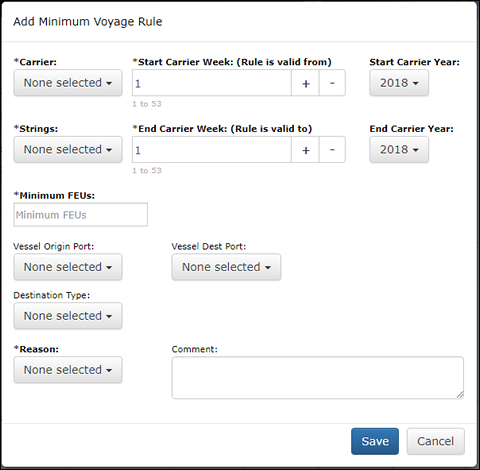
Figure 4: Add Minimum Voyage Rule
3 Click Save to add the Voyage Rule.
![]()
You can add a desired target number of FEUs for a specific carrier and string that should be adhered to depending on the carrier week.
|
Note: Voyage Target Rules will now be automatically created by the system when a Carrier rejects volume to manage the maximum FEU the Carrier is allocated on the next Plan.
You can tell if the Voyage Target rule was automatically created because in the Comments the user will be listed as chq-rollfore. Click to see details about the system-created Target Voyage Rule parameters. |
1 Click Add New. The Add New Voyage Rule pop-up window appears. For the Type of Voyage Rule drop-down list, select Target.
Figure 5: Add New Voyage Rule Pop-up Window
2 The Add Target Voyage Rule pop-up window appears. Select the Carrier and Strings from the drop-down lists. Enter the Start Carrier Week and End Carrier Week that the rule will be valid, and that the instruction will take effect. You can include the Start Carrier Year and End Carrier Year if your instruction spans multiple calendar years.
Enter the Target FEUs and an Acceptable Range of FEUs. Select a Reason for the Voyage Rule.
You can optionally select a specific Vessel Origin Port and Vessel Destination Port and Destination Type to help make your Voyage Rule different from other similar Voyage Rules.
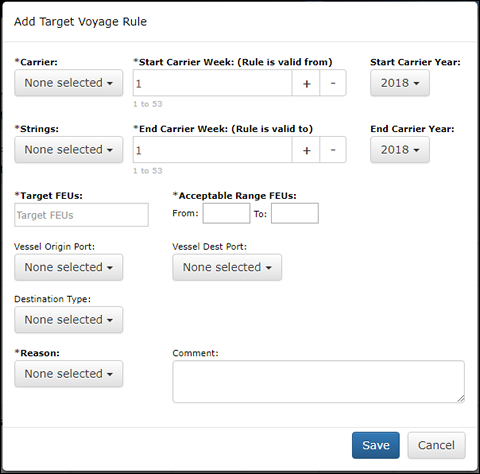
Figure 6: Add Target Voyage Rule
3 Click Save to add the Voyage Rule.
![]()
You can add a maximum number of FEUs for a specific carrier and string that should be adhered to depending on the carrier week.
1 Click Add New. The Add New Voyage Rule pop-up window appears. For the Type of Voyage Rule drop-down list, select Maximum.
Figure 7: Add New Voyage Rule Pop-up Window
2 The Add Maximum Voyage Rule pop-up window appears. Select the Carrier and Strings from the drop-down lists. Enter the Start Carrier Week and End Carrier Week that the rule will be valid, and that the instruction will take effect. You can include the Start Carrier Year and End Carrier Year if your rule spans calendar years.
Enter the Maximum FEUs and select a Reason for the Voyage Rule.
You can optionally select a specific Vessel Origin Port and Vessel Destination Port and Destination Type to help make your Voyage Rule different from other similar Voyage Rules.
|
Tip: To restrict a string from getting any volume, enter 0 for the Maximum FEUs. |
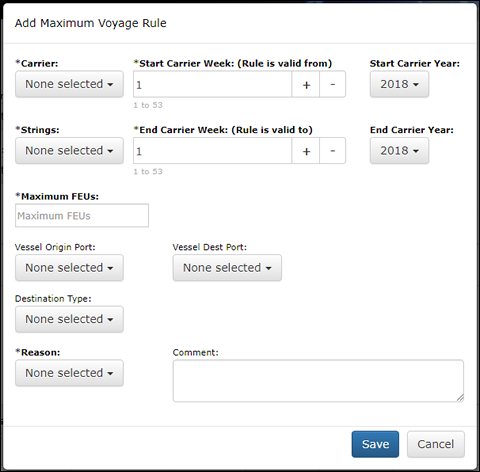
Figure 8: Add Maximum Voyage Rule
3 Click Save to add the Voyage Rule.
![]()
You can select a carrier and string that should not have volume allocated to it depending on the carrier week.
1 Click Add New. The Add New Voyage Rule pop-up window appears. For the Type of Voyage Rule drop-down list, select Prevent Allocation.
Figure 9: Add New Voyage Rule Pop-up Window
2 The Add Voyage Rule to Prevent Allocation pop-up window appears. Select the Carrier and Strings from the drop-down lists. Enter the Start Carrier Week and End Carrier Week that the rule will be valid, and that the instruction will take effect. You can include the Start Carrier Year and End Carrier Year if your instruction spans multiple calendar years.
Select a Reason for the Voyage Rule.
You can optionally select a specific Vessel Origin Port and Vessel Destination Port and Destination Type to help make your Voyage Rule different from other similar Voyage Rules.
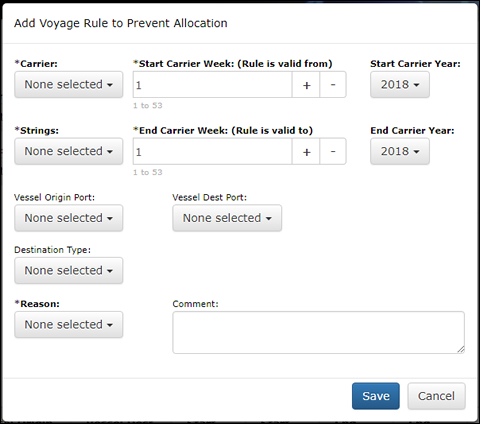
Figure 10: Add Voyage Rule to Prevent Allocation
3 Click Save to add the Voyage Rule.
![]()
Manage Conflicting Voyage Rules
|
Note: Please contact your Expeditors Carrier Allocation representative if would like to implement this feature in your customer organization. |
The Manage Conflicting Voyage Rules tab view shows all system-created target rules and whether or not there are any conflicts or warnings between system-created target rules and existing voyage rules. You must accept the rules before they will be used in a future Plan.
Use the search criteria to filter the rules and click Show conflicts only to show both conflicts and warnings.
If you edit a rule, the rule will be used in the subsequent run of the Plan.
Conflict icon (
 ) appears when the
system-created target rule is in direct conflict with an existing
Voyage Rule. You can click on the icon to show the Voyage
Rule(s) that have a conflict and decide if the system-created
target rule should be deleted or edited; or if the existing
Voyage Rule should be deleted or edited.
) appears when the
system-created target rule is in direct conflict with an existing
Voyage Rule. You can click on the icon to show the Voyage
Rule(s) that have a conflict and decide if the system-created
target rule should be deleted or edited; or if the existing
Voyage Rule should be deleted or edited.
Warning icon (
 ) appears when the
system-created target rule may have a conflict with some aspect
of an existing Voyage Rule. You can click on the icon to show
the Voyage Rule(s) that may be in conflict and decide to accept
the system-created target rule, edit it, or delete it; or
delete the existing Voyage Rule or edit it.
) appears when the
system-created target rule may have a conflict with some aspect
of an existing Voyage Rule. You can click on the icon to show
the Voyage Rule(s) that may be in conflict and decide to accept
the system-created target rule, edit it, or delete it; or
delete the existing Voyage Rule or edit it.
If the system-created target rule is not in conflict with any existing Voyage Rules, you can decide to Accept, Edit or Delete the system-created target rule).
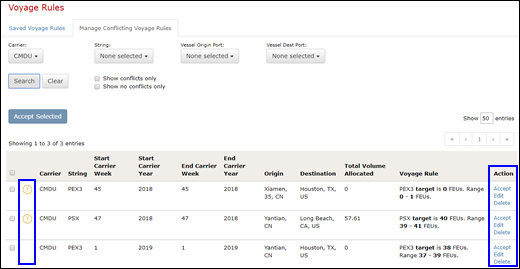
Figure 11: Manage Conflicting Voyage Rules Tab - Icons & Actions
![]()
![]()
© 2021 Property of Expeditors International of Washington, Inc. and its subsidiaries.
Business Confidential and Proprietary. Reproduction by written authorization only.
- Created by: Expeditors Technical Communications Department -