Create Super-CSV Files Part2 |
Formatting product data using Tradeflow's Display Upload Format for a Super-CSV file continued:
6 After the field definition section, the data section should begin on the next row and should appear in the same order as the definition section.
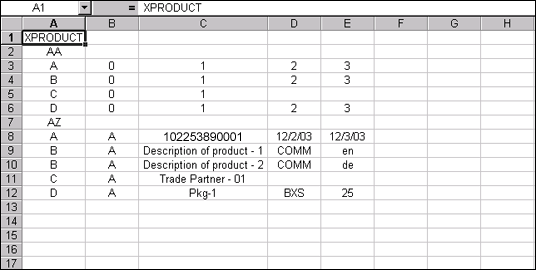
7 Type the data for the respective Field IDs below the row AZ as shown in Figure 1. All products begin with an A row, which is the Product Information section. In this case, we are adding a new Product with two descriptions, one vendor, and one Standard Package Detail.

Figure 1: Formatting Product Data
8 Column B is required for the action on the record. Fill in Column B with the database value that corresponds to the action. Possible actions include:
Database Value |
Action |
A |
Add |
M |
Modify |
U |
Update if present, add if not |
D |
Delete |
Enter the database value A to Add. To modify, update, or delete an existing product, replace the database value A in the second column by M, U, or D. The prerequisite for modifying or deleting records while uploading is that the same set of records exists in Tradeflow's database. The Update action is a hybrid between Add and Modify, if the product doesn't exist, it will be added, if it does exist, it will be modified.
|
Caution: When adding a vendor or manufacturer, the Trade Partner must already exist in the Trade Partner Centre. Country-specific rules based on the country profile apply to the upload file (e.g. enabled fields, required fields) |
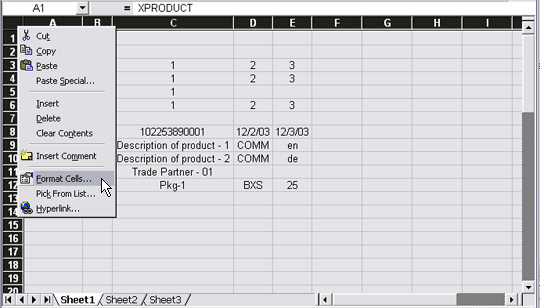
9 After filling in the data, delete any blank rows from the middle or top of the spreadsheet. Select all of the cells by clicking the gray box in the upper left-hand corner. Right-click and select Format Cells... from the arrow menu.

Figure 2: Select all cells, then right-click and choose Format Cells...
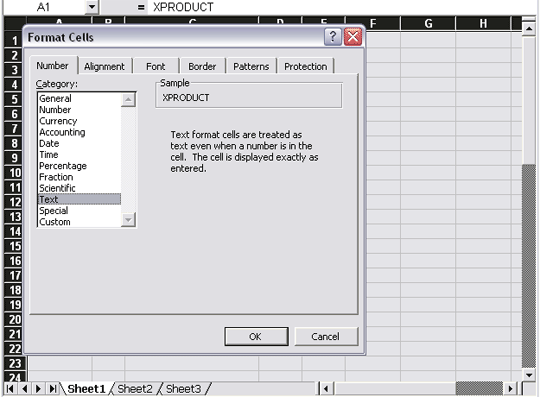
10 In the Number tab, select Text. Click OK.

Figure 3: In the Number tab, format the cells to Text.
11 Save the spreadsheet as an Excel file.
12 Then save the spreadsheet again as a comma separated value file (.CSV). Select File>Save As... and then in the Save as type field, click the drop-down list and choose CSV (comma delimited).
© 2021 Property of Expeditors International of Washington, Inc. and its subsidiaries.
Business Confidential and Proprietary. Reproduction by written authorization only.
- Created by: Expeditors Technical Communications Department -