PO Management
![]()
|
The PO Management page allows you to manage permanent allocations and update PO routing and dates. |
From the Home page, click the Manage Allocations menu in the right-hand corner of the page, then click PO Management. All customer POs will be shown here and you can view the PO details.
|
Tip: You can add additional filters to the search that are specific to your company. Contact your Expeditors Representative for more details. |
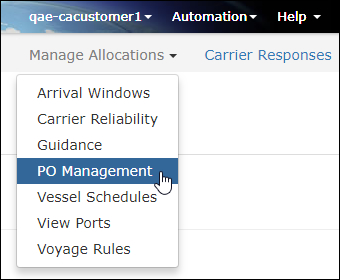
Figure 1: Manage Allocations - PO Management
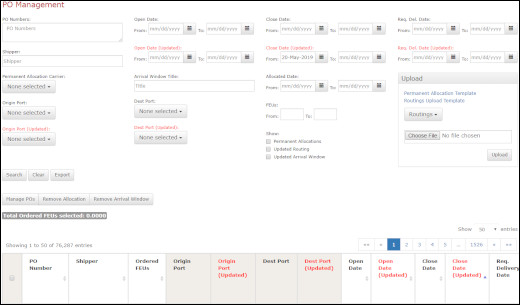
Figure 2: PO Management Page
Search for any PO in the system and permanently assign them to vessels or view permanent allocations.
|
Tips: If you want to do one-time allocations for a PO to a vessel, click to see more details on how to manually assign POs to a vessel.
The Total Ordered FEUs selected will show you the total FEUs of the POs that you have selected.
See Step 4 below on how to use an upload template to upload permanent allocations. |
1 Enter search criteria in the fields and click Search to find specific POs of the same origin and destination ports. Select the check box next to the POs you want to assign to a vessel and then click Manage POs. You can also click Manage POs and copy and paste a list of POs.
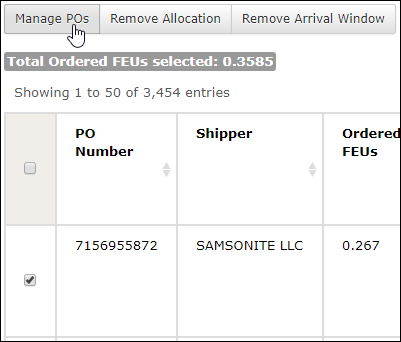
Figure 3: Manage POs
2 The Manage POs page appears with a list of the POs you selected and options. Click Permanently Allocate to see a list of carriers and strings that work with the POs.
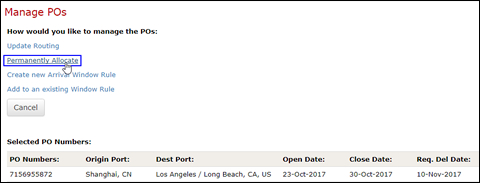
Figure 4: Manage POs Page - Permanently Allocate
3 The Permanently Allocate POs page will appear. Search by ETA using a date range and click to select the string you want. Select a Reason, you can enter a Comment if needed, and then click Allocate.
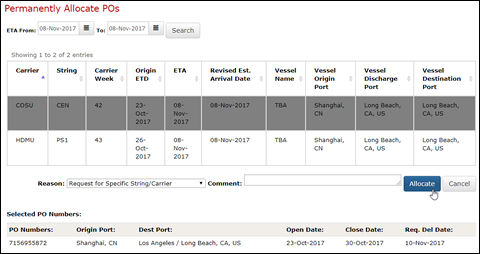
Figure 5: Permanently Allocate POs
4 Alternatively, you can upload permanent allocations. In the PO Management page, click Permanent Allocation Template in the Upload section and fill in the template with the allocations you want to upload. Use the Reason to change the allocations, for example, REMOVE_PERMANENT_ALLOCATION will delete the allocation for the PO entered.
Select Permanent Allocations from the drop-down list and then click Choose File to find the template you modified. Click Upload.
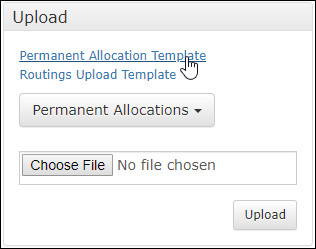
Figure 6: Upload Permanent Allocations
![]()
Update PO Routing Ports or Dates
|
Tip: See Step 4 below on how to use an upload template to upload changes to PO routing ports or dates. |
1 Search for the POs in the system that you want to update. Select the check box next to the POs you want to update and then click Manage POs. You can also click Manage POs and copy and paste a list of POs.
Figure 7: Manage POs
2 The Manage POs page will appear with a list of the POs you selected and options. Click Update Routing.
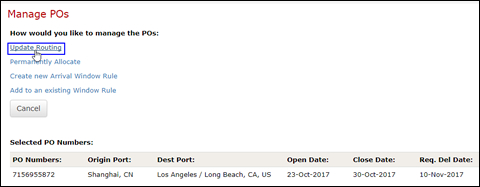
Figure 8: Manage POs Page - Update Routing
3 The Update Routing page will appear. Select the new ports and/or dates for the POs and enter a Comment.
Click Update PO Routing to make the changes to the PO. The original ports and dates will be saved in the system.
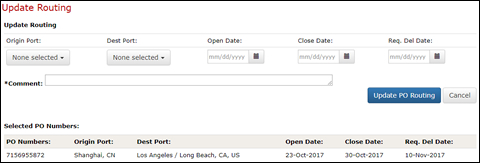
Figure 9: Update Routing
4 Alternatively, you can upload changes to the routing or dates. In the PO Management page, click Routings Upload Template in the Upload section and fill in the template with the PO numbers and the new ports and/or dates for the POs. The Comment is required.
Select Routings from the drop-down list and then click Choose File to find the template you modified. Click Upload.
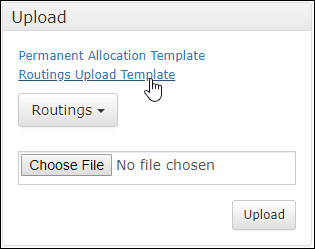
Figure 10: Routings Upload Template
5 If you want, you can also choose to Permanently Allocate the POs by clicking Permanently Allocate POs.
![]()
Create New PO Specific Arrival Window Rule
1 Search for the POs you want to create a new PO Specific Arrival Window Rule for. Select the check boxes next to the POs you want and click Manage POs. You can also click Manage POs and copy and paste a list of POs.
Figure 11: Manage POs
2 The Manage POs page will appear with a list of the POs you selected and options. Click Create new Arrival Window Rule.
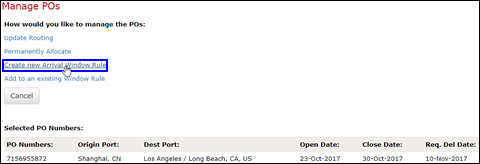
Figure 12: Manage POs - Create New Arrival Window Rule
3 The New Arrival Window Rule page will appear. Enter a Title for the arrival window rule. You can search on this title to find the rule.
Click and drag the sliders to choose the Window of days before and/or after the Requested Delivery Date that you want.
|
Note: If you choose an effective PO close date that overlaps with a previous window rule, you will be notified of the overlap and have the option to change it. |
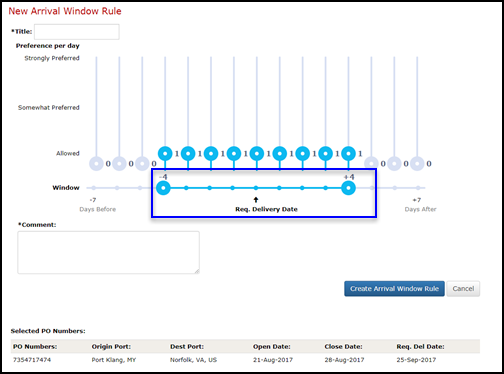
Figure 13: Window Slider
4 Then, you can click and drag the vertical sliders to indicate, on a scale of 1 to 10, your preference for that day for allocating PO purposes. 10 is strongly preferred, while 1 is allowed.
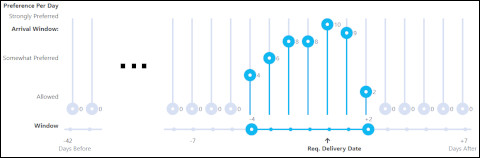
Figure 14: Preference Per Day
5 Add a Comment. Click Create Arrival Window Rule when you are finished.
![]()
Add to an Existing PO Specific Arrival Window Rule
1 Search for the POs you want to add to an existing Arrival Window Rule. Select the check boxes next to the POs you want and click Manage POs. You can also click Manage POs and copy and paste a list of POs.
Figure 15: Manage POs
2 The Manage POs page will appear with a list of the POs you selected and options. Click Add to an existing Window Rule.
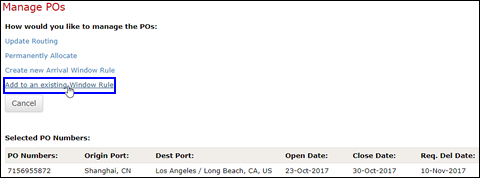
Figure 16: Manage POs - Add to an Existing Window Rule
3 The Add POs to Existing Arrival Window Rule page will appear. Use the PO Number or Allocation Window Title fields to narrow the number of arrival window rules shown.
Click to select the arrival window rule that you want to add the POs to and add a Comment. Click Add POs to existing Rule when you are finished.
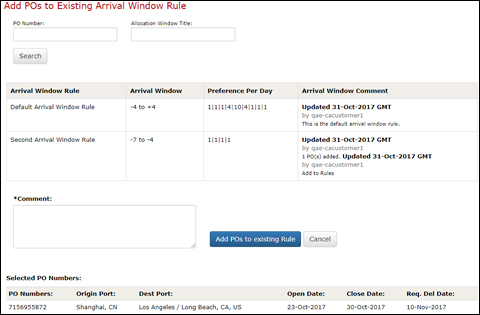
Figure 17: Add POs to Existing Arrival Window Rule Page
4 See Arrival Window - PO Specific Arrival Window Rules for more information about editing an existing PO Specific Arrival Window Rule.
![]()
![]()
© 2021 Property of Expeditors International of Washington, Inc. and its subsidiaries.
Business Confidential and Proprietary. Reproduction by written authorization only.
- Created by: Expeditors Technical Communications Department -