A: Here
are some guidelines that will help when you are trying
to do an extraction:
Excel has limitations on what
it can handle. Hence, MS-Excel (XLSX) files have
an upper limit of 1,000,000 records or rows.
If you want to go up to that limit,
we recommend no more than 10 columns.
Larger fields can cause more problems.
Notes and descriptions are the largest fields.
Even if individual descriptions are short, the
field length is still identified in the database
and may cause challenges.
If you want to have 20 columns,
we recommend limiting the number of records to
30,000.
You can also filter by a column
without extracting it. In the Search
Fields section, deselect the Display
checkbox next to the column you want to remove.
Then click Search.
The search results will continue to be filtered
by all of the search criteria, even if the column
is not being displayed but when you extract the
search results, the column will not appear.
Extractions with more than 20
columns (especially with notes or descriptions)
will likely be too complex and will not extract
successfully.
A: Yes,
the PMC is fully EDI capable. Contact your Expeditors
representative for setup and implementation details.
Data can be sent and/or received with any ERP
or other customer system as well as with your trade
partners' systems.
A: Comma
Separated Value (CSV) file format will drop the leading
zeros from a saved file. For example, an organization
may have Product IDs of 0001, 0002, 0003. The
product upload file is created and saved as CSV but
the Product IDs will no longer have the zeros. To
fix this, the file needs to be opened and modified.
One way to avoid this problem is to extract using
the MS-Excel with names (XLSX) format (where available).
Generally, CSV format is best when providing
data to a computer and MS-Excel with names (XLSX)
is more user-friendly.
To fix files that have
been losing/dropping the leading zeros:
1. Change
the file name extension to be .txt instead of .csv.
For example, if a file is named "MyResults.csv"
you would change it to be "MyResults.txt"
2.
In Excel, click File>Open. Select the
file you renamed to be a .txt file in step 1.
3.
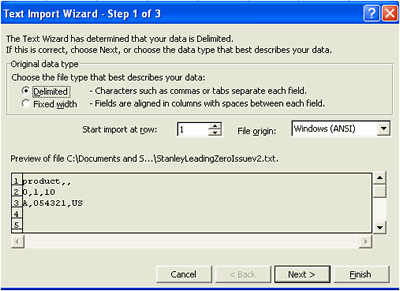
The Text Import
Wizard will appear.
Figure
1:Text Import
Wizard
4.
Select the Delimited
radio button and then click Next>.
5.
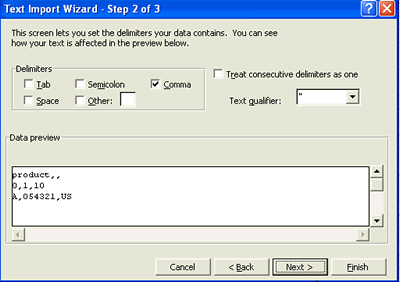
For Step 2 of 3, select only the comma
check box, then click Next>.
Figure
2:Step 2 of
3 in Text Import Wizard
6.
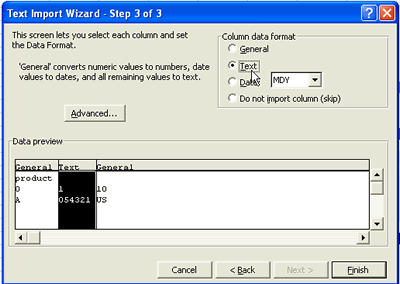
For Step 3 of 3, click the column(s)
with the leading zero data (in this example, the middle
column) and select the Text
radio button.
Figure
3:Step 3 of
3 in Text Import Wizard
7. Click Finish, the file
will now open without dropping leading zeros. Click
File>Save Asand
select.csv.
When you save, make sure your column
with the leading zeros is formatted as text.
A: Each
file format can be used by users to upload data into
the system.
CSV
format is the most simple and flat format, much like
a spreadsheet. It can handle most simple relationships
within the data (for example, a product with 1 HS
Code, a booking with 1 product, etc.).
Super
CSV is a bit more complex and structured but
still something that is viewable in Excel. This
format can support most 1-to-many relationships with
respect to the main thing you are uploading (for example,
a product with multiple descriptions, a partner with
multiple contacts, a booking with multiple products).
XML
is the most comprehensive and complex format available.
This format supports nesting and a variety of
levels of data (for example, a product kit with multiple
classifications and different details by component
or sub-component).
Generally, the CSV format can send data to basic
screens whereas the Super-CSV and XML are required
for more advanced screens.
A: Each
file format can be used by users to extract data from
the system.
CSV and
MS-Excel (XLSX) formats are
structurally the same in terms of content. Users
would select XLSX over CSV for human-readable reports
or content that they would want to analyze in Excel
(Excel tends to change CSV data like removing leading
zeros or reformatting columns).
CSV works best for sending to another system. Both
the CSV and XLSX formats offer the ability to pull
coded data elements (e.g., country) out as a name
(e.g., Switzerland) or as a code (e.g., CH).
The difference between CSV/XLSX and XML
is similar to the differences in the uploads. CSV/XLSX
extracts support the more basic functions in the Centre
and simpler (1-to-1 - e.g., a product with 1 description)
data whereas the XML supports the more complex (1-to-many
- e.g., a booking with documents) scenarios.
A: If you
would like more information about Tradeflow, contact
Tradeflow Sales. Go to the Tradeflow login page and
click the Contact
Tradeflow Sales link under the Support category.
Fill out the desired fields on the Contact page and
click Send.
A: If you
need assistance with Tradeflow, contact Tradeflow
Helpdesk. Go to the Tradeflow login page and click
the Contact Tradeflow
Helpdesk link under the Support category. Fill
out the desired fields on the Contact page and click
Send. The
Contact Tradeflow
Helpdesk link is also on the left navigation
panel of all pages in Tradeflow. If you click
on one of the links while logged in, all of your information
will pre-populate the form.
A: The Find Products page allows
you to enter a list of products separated by a comma
and return all the results that meet the criteria.
This works in any text field search.
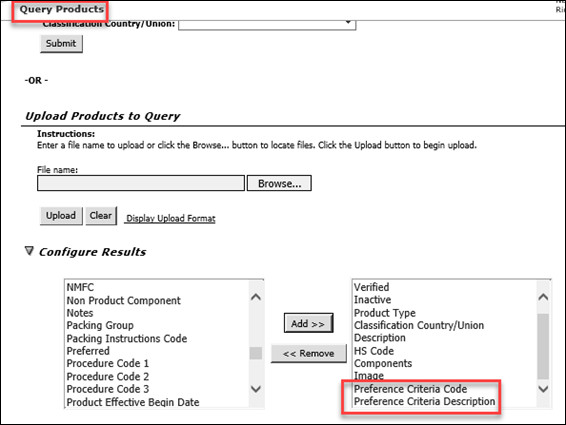
A: If you
have a spreadsheet or a list of parts (say from a
commercial invoice) and you want to get a quick report
for the classifications that exist and identify the
products that arent yet classified, you can use the
Query Product page.
This page will allow you to upload your spreadsheet
and create a customized report (like the Find Products
page). You can also paste a list into the text
box on screen. This text box can handle a list
separated by commas as well as carriage returns (so
you can paste directly from Excel).
A: Many
fields in the PMC are enabled, disabled, or required
based on country-specific applicability. ALADI,
for instance, is only applicable for certain countries
in Latin America that participate in the program.
If you feel something is disabled in error,
Contact Support
and we will make any necessary changes.
A: Yes.
To add export information to an existing product
with import information, simply select the Export
check box on the Product
Information section and all applicable fields
for exporting from that country will be enabled. If
there is a different HS code for export, you can add
that as well as any other supplemental compliance
details (e.g., Export Control Number, License details,
etc.).
A: When
sourcing from multiple vendors, Tradeflow allows you
to maintain vendor-related trade information at the
product level if it is same for all vendors. If
not, you can associated the information to each individual
vendor. To store by vendor, select the Maintain Vendor-Related
Trade Information check box that appears in
the Vendor
and Manufacturers section on the Advanced
page. The system will prompt you to the change.
To edit the details, go to the advanced tab
and click on each vendor row to update. At the
bottom of the vendor detail screen will appear a new
box where Duty Reduction Program, Country of Origin
and other fields can be updated.
A: Make
sure the product record contains a valid HS code and
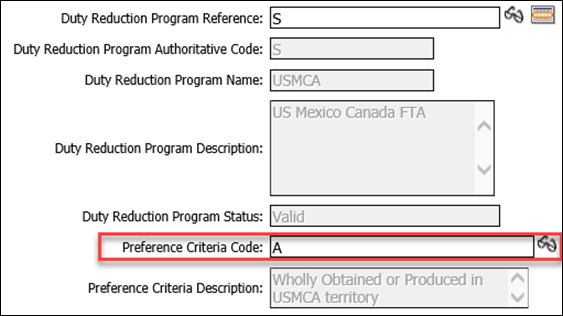
Duty Reduction Program Reference (DRP Reference).
Once the DRP Reference value is entered (for example,
S – USMCA), the Preference
Criteria Code field will be enabled and you
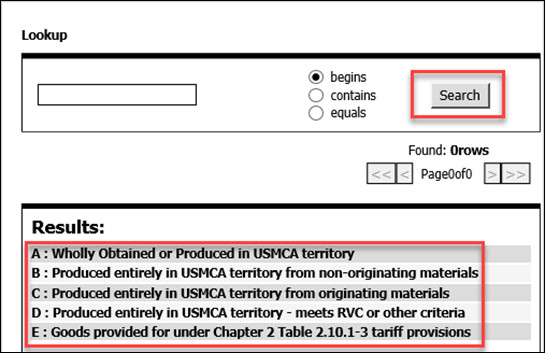
can enter the code. You can use the Lookup icon () to find the
preference criteria code you are looking for.
A: You can
use the Lookup icon () to find
the preference criteria code you are looking for.
As long the HS code and the DRP Reference are valid,
the Preference Criteria Code table will become available.
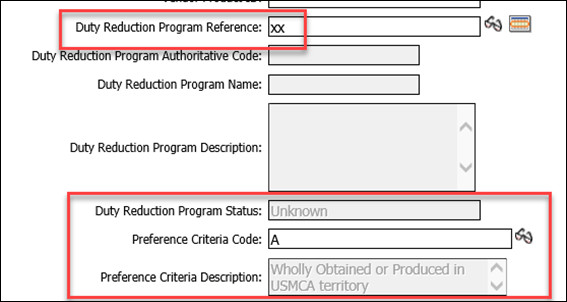
A: The Preference Criteria Code
Description is only available when the product
record contains a valid HS and DRP Reference, and
is within the USMCA jurisdiction (US, CA, and MX).
Otherwise, the description will show as Unknown.
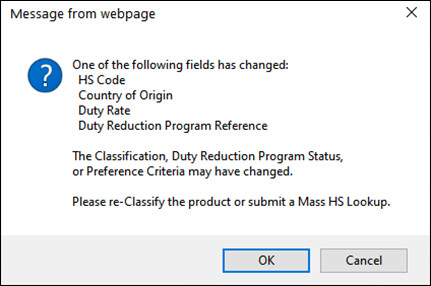
A: No, you
will get a pop-up warning of the change. If you click
OK, the Preference Criteria Code
will be removed and you will need to re-enter it again
or re-classify the product.
A: Yes,
you can. As long you are updating the same information,
you can use the Mass Update functionality. See Preference Criteria
- Mass Update for more information.
A: Yes,
you can. Be sure to include field 146 and the Preference
Criteria Code on the product upload file. See Preference
Criteria - Upload File for more information.
A: Yes,
Tradeflow will cross reference against the validation
table to check if your information on the product
upload file meets the qualification. If it does not
meet the qualification, you will get an error file
with the message.
A: Yes,
EDI or other forms of data exchange can be set up
with any capable service provider. This can
be set up for a nominal testing and implementation
fee. Customers can also provide access for their
service providers using the web interface. Contact Support for
more information.
A: Documents
such as binding rulings, trademark, or other royalty
forms can be attached to products to share them with
any of your trade partners. See Manage
Images for more information.
If you are also using the Shipment
Management Centre (SMC), these documents can be
flagged to be pulled automatically when these products
appear in a booking.
A: Yes,
you can provide brokers with a Limited Edit role to
the PMC. The brokers can then create a new part
and assign it to a user at the customer location to
obtain classification confirmation prior to the filing
of the Customs declaration. This will also keep
a detailed record of the correspondence tied to the
product. Contact
Support to assign Limited Edit roles.
A: Yes.
The PMC has a variety of customizable business
rules that can be set by the Organization Administrator.
The types of rules available include field lengths
and formats, required fields, and valid values for
text fields. Organization Administrators can
also choose to hide fields that are not used to make
the basic tab screen shorter. See Preferences
for more information. Only the Organization
Administrator can make these changes.
A: All users
can create their own personal saved searches on the
Find Products screen.
See Search Feature
for more information.
To create a custom report:
1.
Determine the fields you want to search and
report on as well as any filtering criteria you need.
2.
Once you have the report you are looking for,
enter a name for the search and click Save.
If you only want to save the layout of the form without
the filters, click Save
Fields Only instead. It will be added to your
list.
Organization Administrator users can share reports
within their organization. The process is the
same, except that the Shared
Search check box needs to be selected to be
able to share the report to all users within an organization.
A: exp.o
allows each customer to have 10 fully customizable
reference fields. You can rename these fields
to be anything you want. The Organization Administrator
can update the field labels in the Preferences screen.
These changes are then visible to all PMC users
for this customer, both on the data entry screen as
well as the search screen.